Adding the code snippet to your website only takes 30 seconds!
Still not sure? Send this page to your developer and ask them to put your code snippet in your website!
NOTE: it may take 2-5 minutes after saving for VisitorTracking to start tracking new visitors so please stay on your site for a minute or two and click around a bit to ensure it is working!
How to add Visitor Tracking script via Google Tag Manager (GTM)
🔹 Step 1: Copy Your Tracking Script
- Log in to your account.
- Go to the All Sites page.
- Find the website you want to track.
- Click Copy Script to copy your unique tracking code.
(This is the same script you’d normally place inside the<head>tag of your site.)
🔹 Step 2: Log in to Google Tag Manager
- Visit https://tagmanager.google.com.
- Select the container for the website you want to add the script to.
🔹 Step 3: Create a New Tag
- In the left sidebar, click Tags → New.
- Click Tag Configuration and select Custom HTML.
- Paste your tracking script into the HTML box.
- Leave “Support document.write” unchecked.
🔹 Step 4: Set the Trigger
- Under Triggering, click Choose a trigger.
- Select All Pages so the script runs on every page of your site.
(This ensures it loads in the<head>area for all pages.)
🔹 Step 5: Save and Publish
- Click Save to store your new tag.
- In the top-right corner, click Submit to publish your changes.
- Add an optional version name like “Tracking Script Added” and click Publish.
🔹 Step 6: Verify the Installation
You can confirm that your script is installed by:
- Visiting your website and checking the View Source (it should appear in the
<head>section). - Or by visiting the site, waiting a couple minutes and seeing if a new visitor shows up in the Visitors page in the Visitor Tracking app.
How to add Visitor Tracking script on Shopify
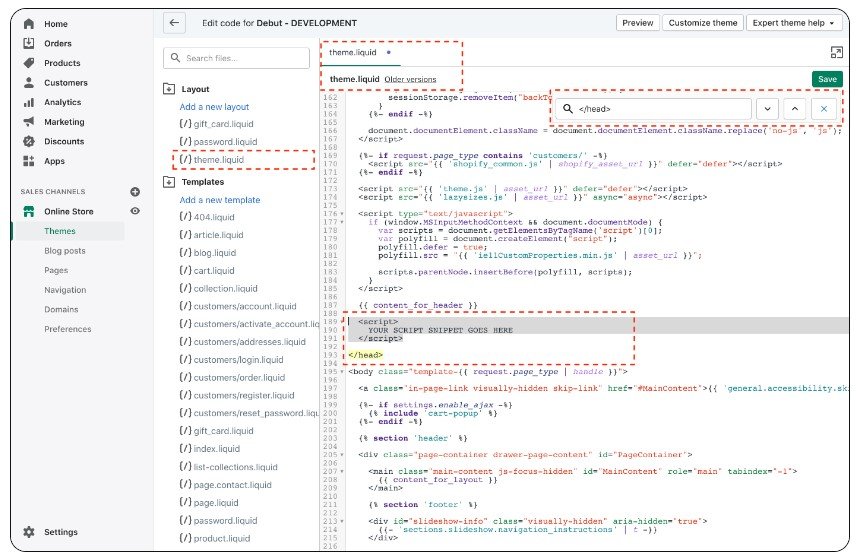
If you go to your themes and click on theme.liquid. You will add your snippet by pasting it on the line directly above the end of the </head> tag
- In Shopify Admin go to Online Store → Themes.
- Find your live theme, click Actions → Edit code.
- Under Layout, open theme.liquid.
- Search for the closing
</head>tag. - Paste your tracking snippet immediately above it.
Here’s a screenshot of where you’d put it:

Important note about Shopify conversion tracking:
Due to Shopify’s recent platform updates, it’s no longer possible to add custom scripts directly to the checkout pages (shipping and payment steps). This limitation may affect conversion tracking accuracy, as your tracking script will only run on site pages outside of checkout. In most cases, tracking will still function correctly once a user reaches the “Thank You” or order confirmation page, but note that mid-checkout events can’t be captured with a standard tracking script.


